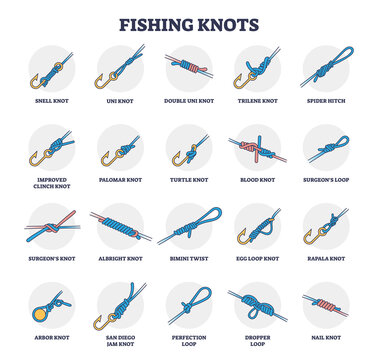
Information On How To Correctly Tie Your Fishing Knots
Understanding how to properly tie your fishing knots is essential for any angler. While beginners often rely on basic overhand knots, seasoned anglers know that this limited approach won’t cut it on the water. It’s important not only to choose the right knot for a specific scenario but also to understand which knot is best for connecting the mainline to the hook and which one works best for joining two lines. Poorly tied knots can lead to significant issues; they tend to be weak and may cause the main fishing line to snap. Additionally, loose ends can easily get caught in weeds or tangled with fishing gear, creating further complications. To assist you in mastering your fishing knots and selecting the most suitable ones for your needs, we’ve compiled a list of the five best fishing knots ever. We’ll also guide you through the process of tying each one. But first, let’s take a moment to discuss some key practices for tying fishing knots effectively.
It’s always a good idea to moisten the knot with water or saliva before tightening it. This lubrication reduces friction and helps maintain the integrity of the fishing line. When tying your knots, ensure you pull them snugly. A tight knot decreases the chances of slippage, which can lead to losing your catch. Another key point is to trim the excess ends of the knots as close to the knot as possible. Long tails can snag and tangle your fishing line in unwanted ways. By adhering to these best practices for each knot, you can achieve optimal results on your fishing adventures. Now, let’s take a closer look at the five best fishing knots of all time and the techniques for tying them. We’ve provided detailed instructions, along with helpful infographics and knot-tying videos to guide you. Soon, you’ll be tying knots like a pro!
An improved clinch knot is among the most popular fishing knots used by anglers. Before diving into its uses and benefits, let’s take a moment to learn how to tie it. How to Tie? Tying an improved clinch knot is a straightforward process that can be completed in four simple steps. Start by threading the end of your line through the eye of the hook or swivel. After pulling through about six inches of line, double it back on itself and twist it five to seven times. Next, thread the end of the line through the small loop created just above the eye, and then through the larger loop, making sure the coils remain neat and do not overlap. Once you’ve threaded the line through both loops, moisten the knot and pull on the tag end. Finally, pull the mainline to tighten the knot securely against the eye, and trim any excess line.
One alternative method for tying the improved clinch knot involves gripping the line and tag end with one hand while using the other hand to rotate the hook or lure, allowing you to achieve the desired number of twists. Application The improved clinch knot is among the most popular fishing knots, offering a reliable way to attach a fishing line to a hook, lure, or swivel. Anglers frequently utilize it to connect the leader to the fly. However, it is advisable to avoid using this knot with test lines over 30 lbs, as it becomes more challenging to tie with heavier lines. If your line approaches this weight, consider reducing the number of twists to four for better performance. Critical Aspects When tying the improved clinch knot, it’s essential to be cautious while tightening it. Applying pressure with sufficient lubricant alters the knot’s structure. The tension causes the wrapped turns to shift, transforming the inner strand into an outer wrap. Proper tightening is vital, as it ensures that the tag end is securely held against the hook.
Relevant with Mono and Braided Lines Experts suggest that improved clinch knots are ideal for lighter monofilament and fluorocarbon lines. However, when it comes to limp braided lines, tying these knots can be challenging and necessitates an additional step. Advantage The improved clinch knot excels when anglers need to connect a small diameter tippet to a sturdy wire hook. The extra tuck at the end is particularly beneficial when battling a strong fish, as it helps maintain line stability. To tie a Palomar knot, begin by taking about six inches of fishing line and doubling it before threading it through the hook’s eye. Next, create an overhand knot with the doubled line, ensuring that you don’t twist it and that the hook remains loose. After that, pull the loop end to slide it completely over the hook or lure. For the final touch, apply some lubrication and pull both ends of the line to tighten the knot securely. Don’t forget to trim any excess line. In some variations of the Palomar knot, the final loop is positioned against the hook shaft instead of being pulled down around the bight, which helps to restrict the hook’s movement. The Palomar knot is a straightforward knot to tie, favored by anglers for securing a line to a hook or attaching a fly to a leader or tippet. Many seasoned fishermen regard the Palomar knot as one of the most robust and dependable knots in the fishing world. Key Considerations When creating a Palomar knot, it’s essential to thread the fly or hook through the loop. If the loop is too small, this process can become tricky. Benefits One of the standout benefits of the Palomar knot is its simplicity. Even anglers with moderate experience can easily tie it in low-light conditions or without directly looking at the line and hook. Use with Mono and Braided Lines The Palomar knot is not only easy to tie but also strong and effective, making it suitable for braided lines. While it excels with braided lines, it can also be successfully used with monofilament and fluorocarbon lines.
How to Create the Ideal Fishing Knot
A properly tied knot is as crucial to fishing as a sharp hook. While purchasing a sharp hook is straightforward, mastering the art of tying a strong knot relies heavily on the angler’s expertise. Achieving perfection often requires experience; however, novice anglers can expedite their learning by avoiding common pitfalls and applying effective techniques. It is essential for anglers to understand the significance of each component of the knot that contributes to its strength. There are six key elements that play a vital role in forming a robust and effective knot: the vertical line, the tag end, the wraps, the turns, the loop, and the hitch. What Causes Knot Failures? Knot failures can occur for various reasons. One common issue is slippage under load, which can be severe enough to completely unravel the knot, causing the tail to slide away. Anglers can often detect potential slippage by observing a curly pig’s tail or corkscrew shape at the end of the line, signaling the need for corrective action. Another factor contributing to knot slippage is the development of intense friction points. This situation arises when one or more turns of the knot are subjected to excessive load. Such friction points can be particularly detrimental to fluorocarbon or monofilament lines, as the heat generated can damage the outer layer of the fluorocarbon or the monofilament itself. Identifying slip failures caused by friction points can be challenging. To safeguard your knot from friction and melting, it is advisable to use braided lines or gel-spun polyethylene lines. However, it is important to note that braided lines are more susceptible to complete slippage. Therefore, when considering the risk of slip failure, anglers must make informed decisions about which type of line they feel most confident using. A knot can fail if it is not constructed properly. Failures in knot construction stem from poorly executed knots. Knots that slip under tension are examples of inadequate tying. The single overhand knot, commonly referred to as the granny knot, illustrates a poorly executed or flawed knot. Ineffectively constructed knots diminish the breaking strength of the line material. The key reason one knot may be weaker than another is the number of turns or wraps involved. A well-tied knot features an optimal number of twists or turns to prevent slippage. Sufficient twists and turns help distribute the load and absorb strain effectively.
How to Tie and Maintain Knots Effectively? It is wise to learn multiple knots and practice them regularly. A skilled angler can quickly tie various knots even in challenging conditions. Merely securing a strong knot for the duration of a fishing trip is insufficient. Experienced anglers consistently assess the integrity of their knots. They routinely inspect the working end of the line for signs of wear, such as chafes or nicks. If any damage is detected, it is crucial to replace the entire line and re-rig. Additionally, remember to use loop knots when working with leaders that have a breaking strain of over 20 lbs or 10 kgs. Regularly testing knots by subjecting them to stress is also vital. This destructive testing process reveals how knots gain strength and the reasons for their failure. Mastering the art of tying knots is perhaps the most critical yet often neglected skill in fishing. To excel in recreational angling, practice knot tying until you can do it flawlessly, even with your eyes closed.
Captain Mike at Calibrated Fishing Charters and Tours has been fishing South West Florida for over 26 years. His fishing charter near Siesta Key and Sarasota Florida specialize in inshore, near shore and offshore fishing for Tarpon, Snook, Redfish, Trout, Snapper, Grouper, Sheepshead, Lady Fish, Catfish, Sharks, Kingfish, Mackeral, Porgie, Tuna and more. Regardless of your skill level, our fishing charter services are sure to make your day on the water one to remember. Book a fishing charter with Captain Mike at Calibrated Fishing Charters today!